Saturday, June 4, 2022

Love-June 2022 Blog


 Hello! Hello, Family and Friends. Well it's June, unbelievable. This year is flying by. I hope you all are being blessed with the beginning of summer. 

The new Stampin' Up! Mini Catalog and the Sale-A-Bration Catalog will be available in July. I am so excited! Christmas is my favorite time of year and there are so many wonderful Christmas products in the Mini Catalog. I can't wait for you all to see the wonderful new products, as well, as being treated with free productions from the Sale-A-Bration catalog. You will be able to order free products with any $50.00 or $100.00 purchase you make from Stampin' Up!. So look for the links to the new catalogs in July. 

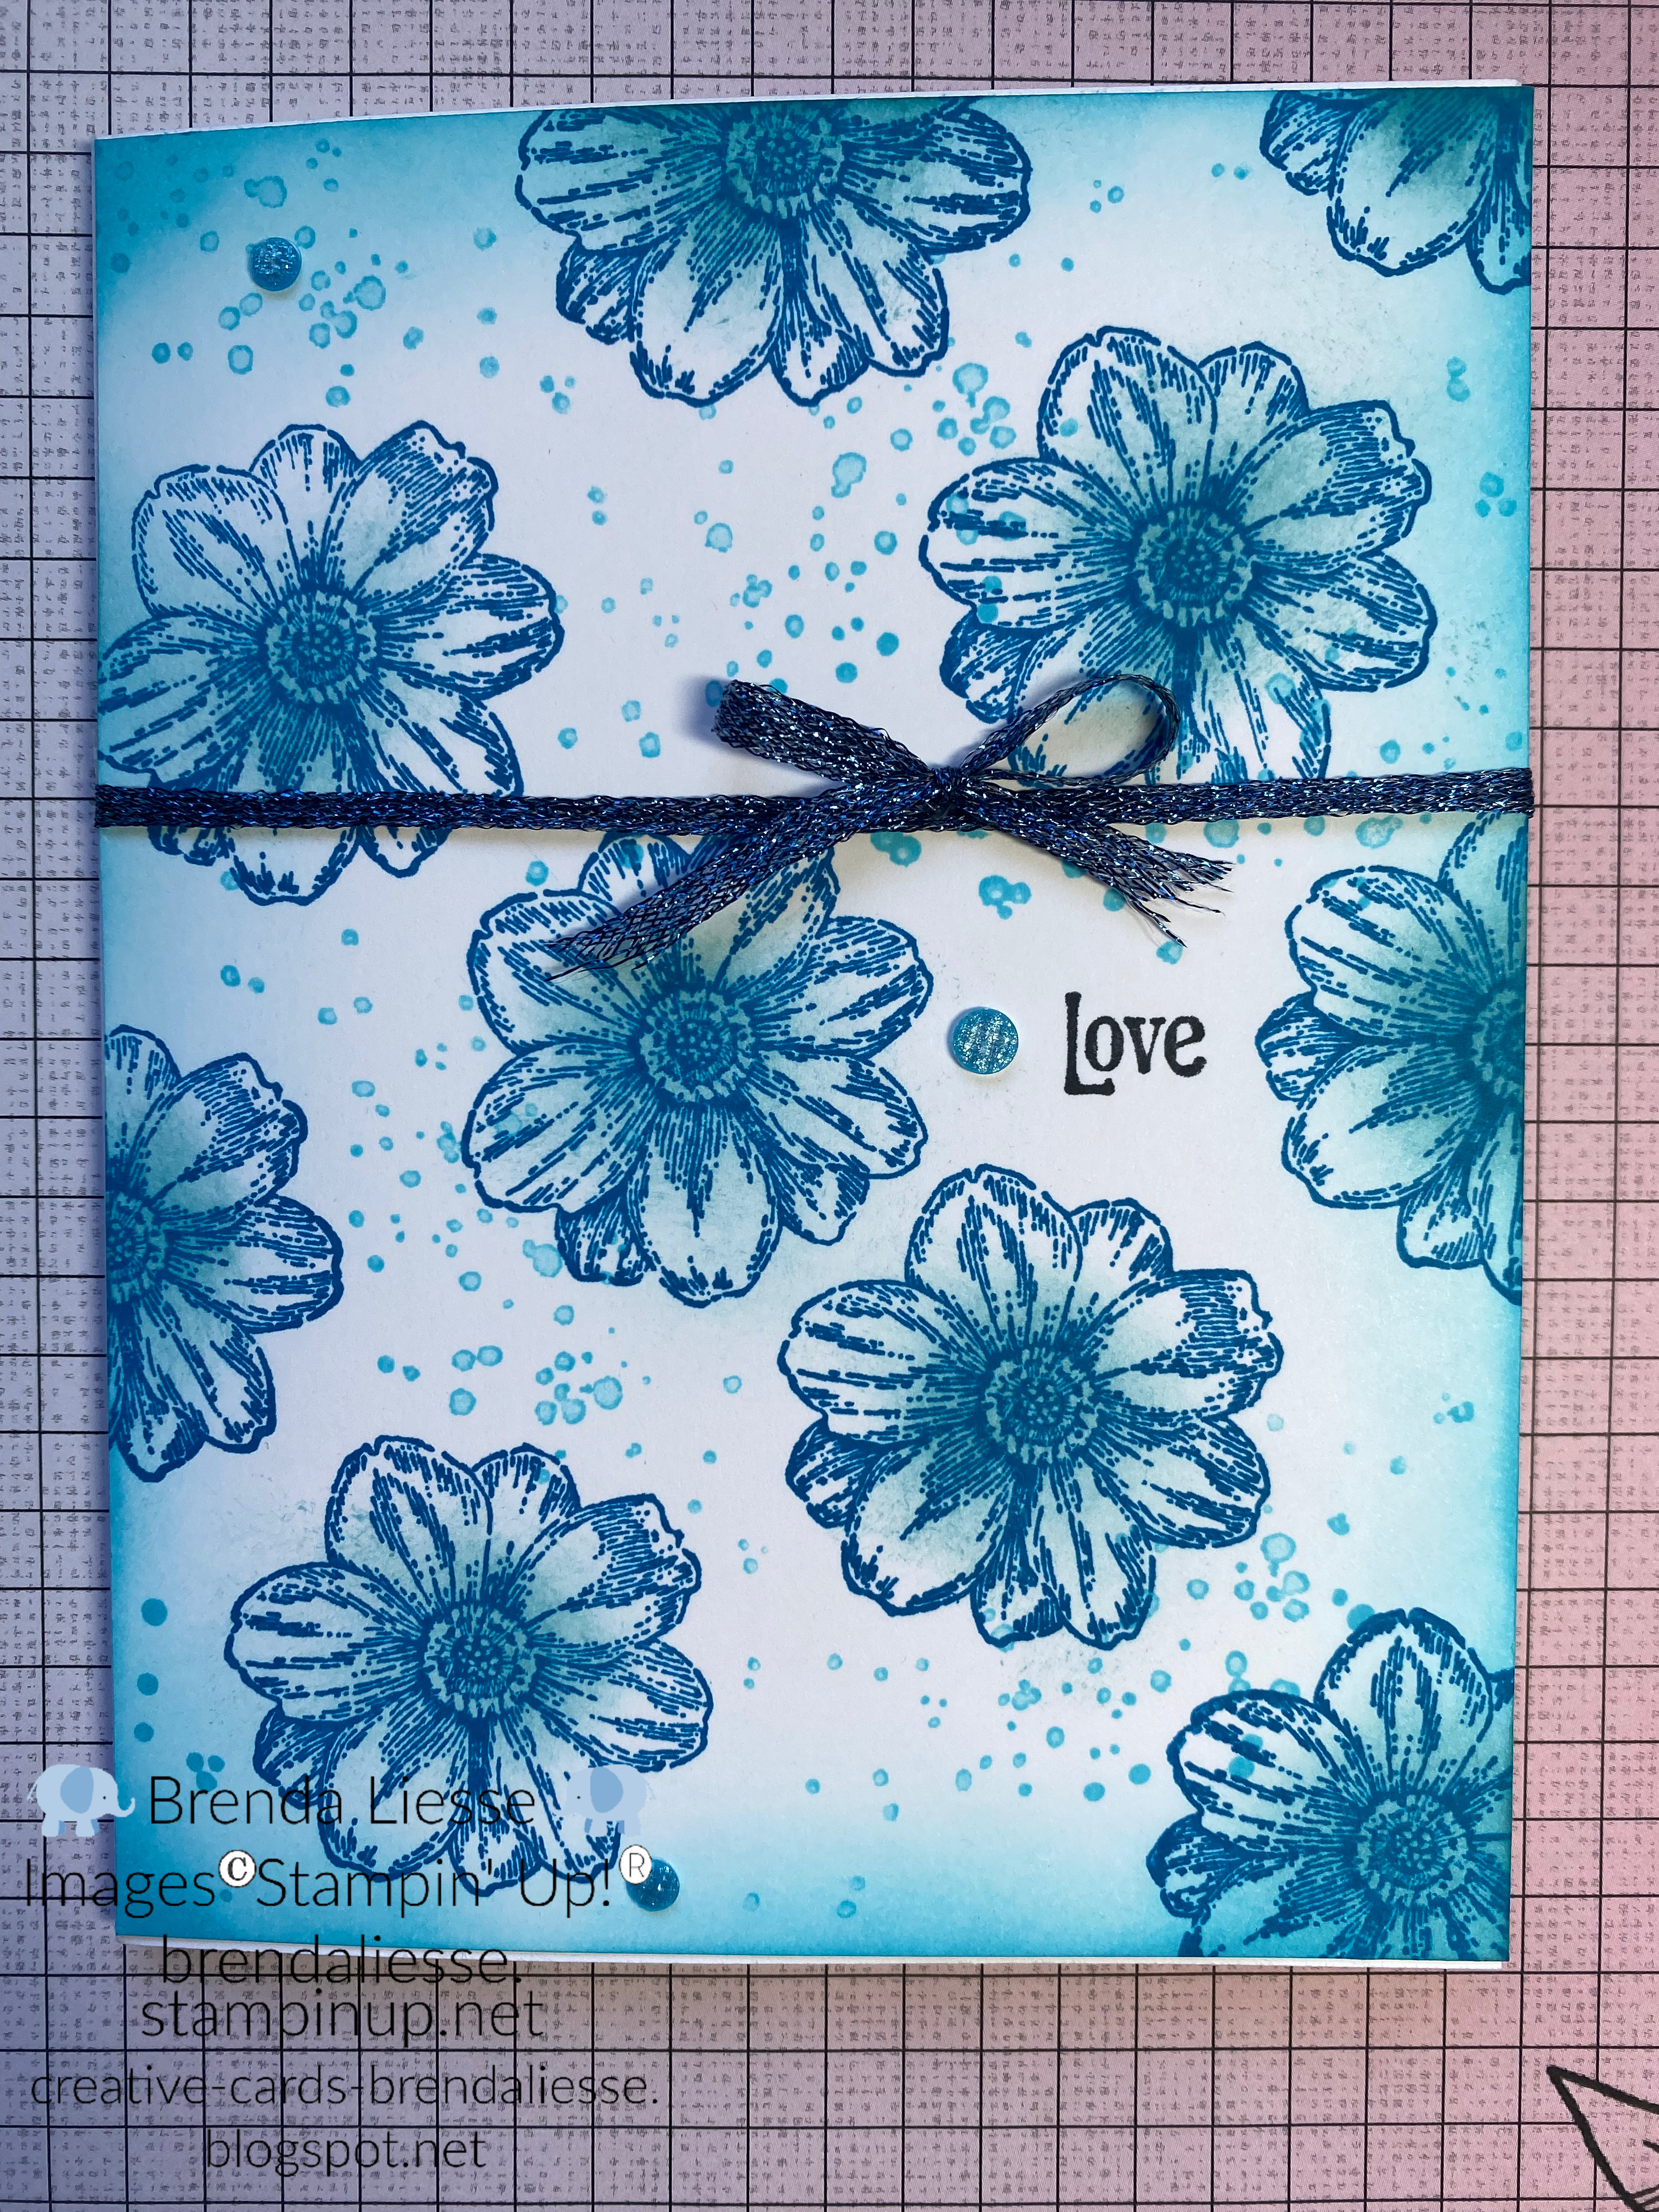
This card was so much fun to make. I was not sure how it was going to turn out but I am so pleased.  I used three different hues of blue. Any color you choose would make a beautiful card. Have fun and play around with various Stampin' Up! ink pad colors.

Supplies:

Product List

Instructions:

  1. Cut a Thick Basic White (BW) card base 5 1/2" x 8 1/2", score at 4 1/4". Burnish score line.
  2. Cut a piece of Basic White (BW) card stock at 5 1/2" x 4 1/4".
  3. Stamp Love were you would like on the BW card stock, using Tuxedo Black ink.
  4. Randomly stamp flowers from tbe Quiet Meadow stamp set, using Pacific Point ink. 
  5. Using a dauber and Balmy Blue ink lightly apply ink to the inside of the flowers. 
  6. Using Balmy Blue ink and second generations stamping (ink up stamp, stamp off on scratch piece of paper, then stamp on card stock) stamp watermarks randomly around the flowers.
  7. Using a blending brush and Tahitian Tide ink, blend ink around the edges of the card.
  8. Wrap Tahitian Tide Metallic Woven Ribbon around the front of the card stock and adhere edges of the ribbon to the back using mini glue dots. Tie a bow and adhere to card front using a mini glue dot.
  9. Glue this piece to the front of the card base using multipurpose glue.
  10. Randomly adhere three gems to the card front. (I used the Fine Sparkle Gems, however , I did not realize they are not available until July. They are in the New Mini Catalog) any glue gem will look great on this card.

11.  In the inside of the card, use Balmy Blue ink and a blending brush.  Blend the ink in a circle in the middle of the card. 
12.  Using Pacific Point ink stamp a flower.
13.  Using Balmy Blue ink and second generation stamping. Stamp watermarks around flower. 

Thank you so much for stopping by and taking a look at this months blog. I hope you give it a try. Until July's post, have a blessed month. 
I appreciate you!

I


Thursday, May 5, 2022

Missing You Tea Cup Card-May 2022 Blog


Hello! I hope this beautiful day in May finds you all well. The new May 2022-April 2023 Stampin' Up! Catalog is out and it is full of beautiful stamps and dies. The new In Color collection is bright and vibrant. Click on the catalog and it will take you to my Stampin' Up? website. There you can take a look at the new catalog.

I got the inspiration for this months card from Debbie Mageed (www.secretstamper.com). I thought it would be a great card to show off the new Tea Boutique Suite. I had a great time designing this card. I hope you give it a try. 

Thank You! for taking a look at this blog. I appreciate you! If you love this card, leave a comment. I would love to hear from you!

Supplies:
Instructions:

1.  Cut a 5 1/2 x 4 1/4" piece of  Sweet Sorbet card stock. This will be the card base.
2.  Cut a  4" x 3 3/4" piece of Sweet Sorbet card stock. Score at 1/2" and 2 1/8", this will be the card front.
3.  Cut a  5 1/4" x 4" piece of DSP (Sweet Sorbet with small lighter colored flowers). 
4.  Cut a 3 7/8" x 4" piece of DSP (Sweet Sorbet with White and Crumb Cake flowers.
Score at 2". Glue DSP to card front using multipurpose glue. Make sure score lines meet. Mountain fold score lines (fold up) and burnish score lines. 
5.  Glue the 1/2" flap onto the card base. Make sure the card front is centered on the card base.
6.  Glue 5 1/4" x 4" piece of DSP to card base.
 7.  Cut a a 3 3/4" x 3 3/4" piece of  basic white card stock. Using Parakeet Party Stampin' ink, stamp leaves from the Tea Boutique Suite stamp set, across the bottom of the BW card stock. Use Garden Green Stampin' ink and stamp the leaves again, slightly below the Parakeet Party leaves.  Stamp sentiment about a 3/4" from the top of the card stock using Sweet Sorbet ink. 
8.  Die cut a solid cup from DSP (flowers and leaves on pink polka-dots) and Sweet Sorbet card stock. Cut the handle and base of the cup off of the Sweet Sorbet tea cup. Glue solid colored handle and cup base to DSP cup. Place dimensionals on the back of the cup. Center cup and adhere to BW card stock. Glue BW card stock with sentiment and cup onto card base. Making sure the BW card stock does not show when card front is closed.  
9.  Die cut out three more cups: one cup from the pink gingham DSP, blue polka-dot DSP and one from the lemon DSP. Die cut a solid cup from Garden green card stock. Cut one detailed cup with leaves from BW card stock, two Sweet Sorbet hearts and a tea bag label (stamp the tea label onto the die cut label and I Miss You with Crushed Curry ink) from Crushed Curry card stock.
10.  Glue detailed BW cup to pink gingham cup near the bottom of the card front at a slight tilt towards the left. (do not glue the top of the cup to the card front, you will need this open to tuck a cup underneath the first cup). 
11.  Glue a heart to the middle of the blue polka-dot cup. Place glue on the bottom front of the cup and tuck under the first cup and adhere to card front.
12.  Cut the handle and cup base from the Garden Green cup. Glue to the lemon cup. Glue this cup to the back of the second cup at an angle. 
11.  Punch a small hole in the tea bag label, thread white Baker's twine through hole. Tie a knot at the label end of  the twine. This will keep the twine from going all the way through the label. Cut twine and glue the other end to the cup. Glue label to the cup. Glue one of the hearts to the label. 

I hope you enjoyed making this card. Thank You for stopping by and trying this card out. 
Have a safe month!

Friday, March 4, 2022

March 2022 Blog-Male Birthday Invitation


 Hello, Family and Friends! Spring is in the air. It is suppose to be  70 degrees in Aztec today. The tulips are popping out of the ground and you can see buds on the trees. I can't wait to see new born farm animals. 

This card is very easy and so much fun to make. I am loving the Your Biggest Fan bundle and Hey Sports Fan DSP. It is a set I, typically, would not buy.  My family are not sports fans. I barrowed the set from my upline Demonstrator and I am having so much fun working with the set. 

I hope you give this card a try. 

I appreciate you stopping by. If you are interested in buying the products used in this card, I hope you will consider shopping with me. Just clink on the shopping link above or on one of the catalogs to the right. You will be directed to my Stampin' Up! shopping link.  

Until next month, I wish you all a wonderful March. For me spring marks the time for new beginnings. If  you have had a rough beginning to 2022, I pray spring brings a new beginning to the rest of this year. 

Supplies:

Product List

Instructions:

  1. For the card base use thick BW card stock and cut at 8 1/2" x 5 1/2", score at 4 1/4". Fold at score line and burnish. The fold will be at the top.
  2. Cut two 4" x 5 1/4" pieces of  Poppy Parade card stock. 
  3. Use Stampin' Seal and adhere one Poppy Parade piece of card stock to the inside of the card and the other to the card front.
  4. Cut a 3 3/4" x 5" pieces of  stitched baseball DSP and adhere to card front.
  5. Cut a 4 1/2" x 3 1/2" piece of flagged DSP, adhere to card front at an angle.
  6. Use the ticket die and cut out the You're out of this League and Admit One ticket from the Ticket DSP. 
  7. Cut out a ticket from the striped DSP. Stamp Happy Birthday using black ink onto the ticket. Using BumbleBee ink stamp stars around the sentiment.
  8. Adhere tickets to the front of the card using dimensionals, as shown in the above picture.  

Card Inside:

  1. Poppy Parade 5 1//4" x 4" mat should already be adhered to the inside of the card. If not adhere using Stampin' Seal.
  2. Cut a 5 1/4" x  2 1/4" piece of stitched baseball DSP and adhere onto the Poppy Parade mat.
  3. Die cut out a You're Invited ticket from the DSP and adhere to the inside of the card. 

Friday, February 4, 2022

February 2022 Blog-Masculine Birthday Card


Hello, Friends! 

This card was designed for my February Creative Card Class. We have not made a masculine birthday card in some time. I find it difficult to come up with masculine card ideas. Once I started thought, I had three cards masculine birthday cards designed in no time. 

This card was my favorite and is easy to make. I hope you will give it a try.

If you do not have a Stampin' Up! Demonstrator and would like one. I hope you will consider me. To purchase Stampin' UP! products from me, clink on the shop link above or the catalogs to the right and it will take you to my Stampin' Up! store. 

I wish you all a great February! I look forward to creating and blogging March's card.

Until then stay well! Thank you for stopping by my blog.

Supplies:

Product List

Instructions:

  1. Cut Evening Evergreen card base at 5 1/2" x 8 1/2", score at 4 1/4". Burnish score line.
  2. Cut Hey Sports Fan DSP at 5 1/4" x 4". Cut a 2" slit down the middle of the DSP on the right side. Fold corners and adhere the tips of the corners using mini glue dots. Use multipurpose glue and glue DSP to the front of the card base.
  3. Cut largest scalloped layering circle (3 1/4" circle) out of scrap Evening Evergreen card stock.  Cut the 2nd largest scalloped layering circle (3" circle) out of scrap Bumble Bee card stock. Next cut out the 3rd largest scalloped layering circle (2 3/4" circle) out of scrap BW card stock. Glue Bumble Bee circle to Evening Evergreen circle.
  4. Stamp man sitting in char, from the A Good Man stamp set, using black ink. Use a dauber and Balmy Blue ink to add color around the stamp. You will need to dab some of the ink off on scrap paper, using circular motions start on scrap piece of paper and move to BW circle and add color around the stamp. Keep doing this until the sky is to your liking. Adhere BW circle to Bumble Bee/Evening Evergreen circle using Stampin' dimensionals. Turn circle with back side facing you. Place a Stampin' Dimensional on left side of circle and glue to the right side of the circle. Adhere centered onto card front. 
Card inside:

  1. Cut a 5 1/4" x 4" BW mat. Stamp birthday sentiment from Handsomely Suited stamp set using black ink.
  2. Cut a 4" x 1 1/2" strip from Evening Evergreen card stock. Glue to BW sentiment mat.
  3. Cut a 4" x 1" strip of DSP and glue on top of Evening Evergreen strip.
  4. Cut another 4" x 1/2" Strip of DSP, glue on top of first DSP strip.
  5. Glue decorated BW mat to the inside of the card base.
All Done!

I hope you had fun making this card. Thank You for stopping by. I appreciate you so much.